


For a recent page I did for Authentique, I created large embroidery floss stitches behind my photo in order to add a bit of visual interest to my page. You can see the full layout here.
Let's get started with the tutorial...

Step 1: With a stitching template & a pencil mark 10 holes along the edge of your page. The stitching template can be anything from a ruler with piercing holes (i.e. Tim Holtz ruler), stitching template or even a circle template. The template I used is transparent so it helps with the placement of my holes and it's meant to create circles. However, it also has a stitching template along the border & this is what I used for my holes. Some people can eyeball this part & don't need to mark the holes, they just pierce the holes right away--I just don't have that talent, if I freehand this part everything will come out lopsided, so I rely on templates!
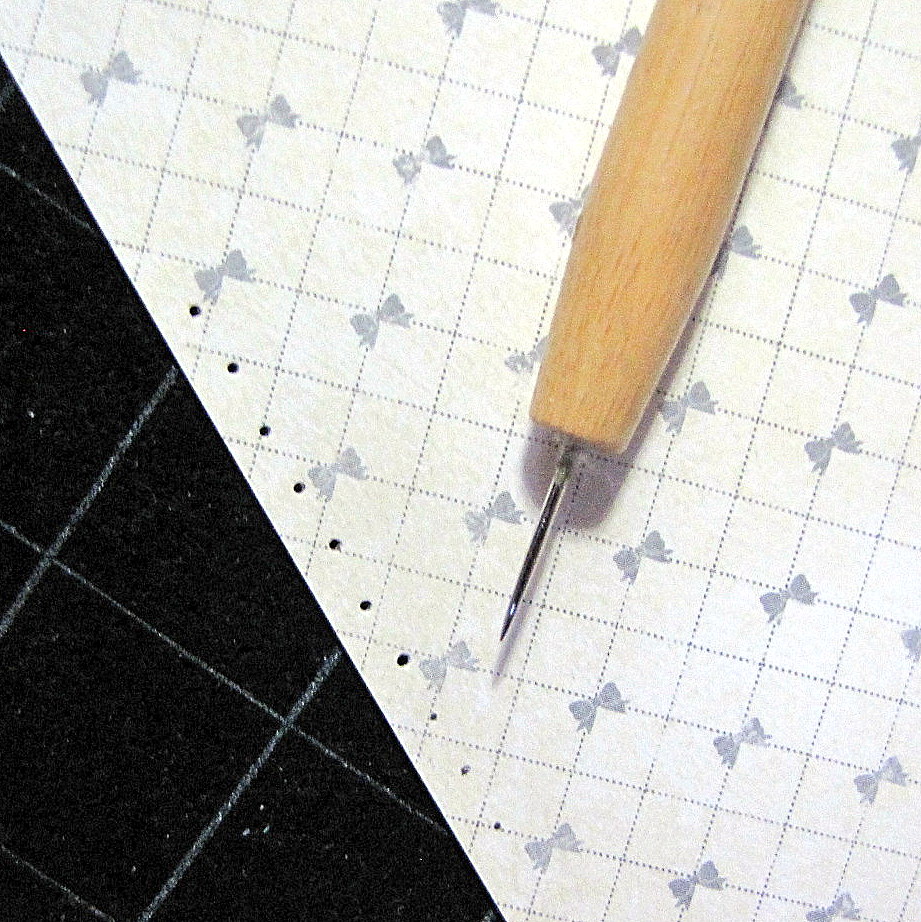
Step 2: Pierce your holes

Step 3: String your embroidery floss & thread the needle through the first hole. I secure the end of the floss with a piece of tape in order to keep it in place.

Step 4: Thread the floss straight across right through the hole on the opposite side of the page

Step 5: To create the next row of floss, from behind your paper, go straight down to the next hole & repeat Step 4

Step 6: Keep repeating steps 4 & 5 until your done threading all 10 of your holes. When you're done it should look like the photo. You'll find that as you string you may run out of floss, when this happens secure the end of the floss to the back of your paper with a piece of tape, rethread your needle & start the same process again. Everything you begin or end your floss, secure it with a piece of tape in order to keep it in place. NOTE: Try to keep your paper as flat as possible & you string your floss. You'll notice that as you string, your paper will tend to curl. Reposition it every time so that it remains flat.

Step 7: This is what the back of your paper should look like. Here you can see where I began threading my floss & at what point I ran out of floss & had to re-thread--which is why you see two pieces of tape holding two ends of floss in place.

Step 8: When done you'll notice that no matter how hard you try to keep your paper flat--it'll still tend to curl up. This is where your leftover scraps come into play. Find a piece of leftover card stock or paper--heavyweight works best so a leftover piece of Authentique paper will do just right! Adhere this scrap to the back. Ensure this scrap is placed right behind your threading--this extra heavy card stock will 'anchor' your page so that it doesn't curl.

Step 9: Finally, take a small strand of the same embroidery floss & tie all the strands together with a simple knot as shown here. You're done! Next step is to embellish away & put your layout together.
Hope you all found this tutorial helpful...thanks for stopping by & enjoy the rest of your week!

What an exciting way to embellish your page! I have a huge box of embroidery floss and should try to use it more in my layouts.
ReplyDeleteThank you for popping in at my blog and for your nice comments!
Gosh... such a fab idea and pretty easy too :D
ReplyDelete